Filariasis laboratory findings
|
Filariasis Microchapters |
|
Diagnosis |
|---|
|
Treatment |
|
Case Studies |
|
Filariasis laboratory findings On the Web |
|
American Roentgen Ray Society Images of Filariasis laboratory findings |
|
Risk calculators and risk factors for Filariasis laboratory findings |
Editor-In-Chief: C. Michael Gibson, M.S., M.D. [1]
Overview
The diagnosis is made by identifying microfilariae on a Giemsa stained thick blood film. Blood must be drawn at night, since the microfilaria circulate at night, when their vector, the mosquito, is most likely to bite. There are also PCR assays available for making the diagnosis.
Laboratory Findings
Identification of microfilariae by microscopic examination is the most practical diagnostic procedure.
Examination of blood samples will allow identification of microfilariae of Wuchereria bancrofti, Brugia malayi, Brugia timori,Loa loa, Mansonella perstans, and M. ozzardi. It is important to time the blood collection with the known periodicity of the microfilariae. The blood sample can be a thick smear, stained with Giemsa or hematoxylin and eosin. For increased sensitivity, concentration techniques can be used. These include centrifugation of the blood sample lyzed in 2% formalin (Knott's technique), or filtration through a Nucleopore® membrane.
Specimen Processing
Preparing Blood Smears
If you are using venous blood, blood smears should be prepared as soon as possible after collection (delay can result in changes in parasite morphology and staining characteristics).
Thick Smears
Thick smears consist of a thick layer of dehemoglobinized (lysed) red blood cells (RBCs). The blood elements (including parasites, if any) are more concentrated (app. 30×) than in an equal area of a thin smear. Thus, thick smears allow a more efficient detection of parasites (increased sensitivity). However, they do not permit an optimal review of parasite morphology. For example, they are often not adequate for species identification of malaria parasites: if the thick smear is positive for malaria parasites, the thin smear should be used for species identification.
Prepare at least 2 smears per patient! Place a small drop of blood in the center of the pre-cleaned, labeled slide. Using the corner of another slide or an applicator stick, spread the drop in a circular pattern until it is the size of a dime (1.5 cm2). A thick smear of proper density is one which, if placed (wet) over newsprint, allows you to barely read the words. Lay the slides flat and allow the smears to dry thoroughly (protect from dust and insects!). Insufficiently dried smears (and/or smears that are too thick) can detach from the slides during staining. The risk is increased in smears made with anticoagulated blood. At room temperature, drying can take several hours; 30 minutes is the minimum; in the latter case, handle the smear very delicately during staining. You can accelerate the drying by using a fan or hair dryer (use cool setting). Protect thick smears from hot environments to prevent heat-fixing the smear. Do not fix thick smears with methanol or heat. If there will be a delay in staining smears, dip the thick smear briefly in water to hemolyse the RBCs.
Examination of skin snips will identify microfilariae of Onchocerca volvulus and Mansonella streptocerca. Skin snips can be obtained using a corneal-scleral punch, or more simply a scalpel and needle. The sample must be allowed to incubate for 30 minutes to 2 hours in saline or culture medium, and then examined for microfilariae that would have migrated from the tissue to the liquid phase of the specimen.
Thin Smears
Thin smears consist of blood spread in a layer such that the thickness decreases progressively toward the feathered edge. In the feathered edge, the cells should be in a monolayer, not touching one another. Prepare at least 2 smears per patient! Place a small drop of blood on the pre-cleaned, labeled slide, near its frosted end. Bring another slide at a 30-45° angle up to the drop, allowing the drop to spread along the contact line of the 2 slides. Quickly push the upper (spreader) slide toward the unfrosted end of the lower slide. Make sure that the smears have a good feathered edge. This is achieved by using the correct amount of blood and spreading technique. Allow the thin smears to dry. (They dry much faster than the thick smears, and are less subject to detachment because they will be fixed.) Fix the smears by dipping them in absolute methanol.
Special Procedures for Detecting Microfilariae
Blood microfilariae:
- Capillary (fingerstick) blood
Since microfilariae concentrate in the peripheral capillaries, thick and thin smears prepared from fingerstick blood are recommended.
- Anticoagulated (EDTA) venous blood (1 ml) should be concentrated by one of the following methods:
- Centrifugation (Knott’s technique)
- Prepare 2% formaldehyde (2 ml of 37% formaldehyde + 98 ml H2O).
- Mix 9 ml of this 2% formaldehyde with 1 ml of patient’s venous blood. Centrifuge at 500 × g for 10 minutes; discard supernatant. Sediment is composed of ***WBCs and microfilariae (if present).
- Examine as temporary wet mounts.
- Prepare thick and thin smears; allow to dry; dip in absolute methanol before Giemsa staining to enhance staining of microfilariae.
- Filtration
- Place Millipore® or Nucleopore® membrane filter (5 µm pore) in filter holder with syringe attachment.
- Mix 1 ml of venous blood (in EDTA) with 10 ml of 10% Teepol® 610 (Shell Co.); allow to stand for several minutes to allow lysis; transfer to a 10 ml Luer-Loc® syringe; attach the filter apparatus.
- Force the solution through the 5 µm pore filter, followed by several syringes of water to wash out the remaining blood, then 1 or 2 syringes full of air to clear excess fluid.
- Prepare a temporary wet mount by removing the filter and placing it on a glass slide, adding a drop of stain or dye and a coverslip.
- For permanent preparations, pass 2 to 3 ml of methanol through the filter while it is still in the holder; remove filter and dry it on a glass slide; then stain it with Giemsa stain, horizontally (so that the filter does not wash off the slide); coverslip filter before examining.
- Centrifugation (Knott’s technique)
Microscopy
Wuchereria bancrofti
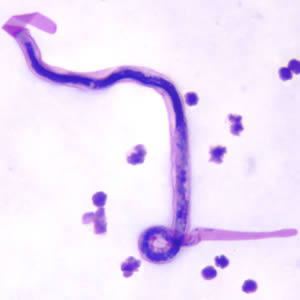
The microfilaria of Wuchereria bancrofti are sheathed and measure 240-300 µm in stained blood smears and 275-320 µm in 2% formalin. They have a gently curved body, and a tail that is tapered to a point. The nuclear column (the cells that constitute the body of the microfilaria) is loosely packed; the cells can be visualized individually and do not extend to the tip of the tail. Microfilariae circulate in the blood.
Shown below is an image of microfilariae of W. bancrofti in thick blood smears stained with Giemsa.

Brugia Malayi
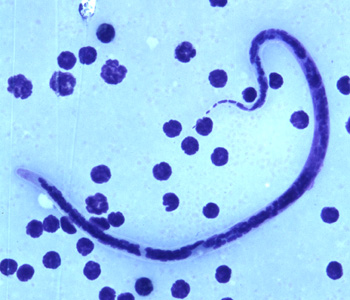
Microfilariae of Brugia malayi are sheathed and in stained blood smears measure 175-230 µm. In 2% formalin they are longer, measuring 240-300 µm. The tail is tapered, with a significant gap between the terminal and subterminal nuclei. Microfilaria circulate in the blood.
Shown below is an image of microfilaria of B. malayi in a thick blood smear, stained with Giemsa.

Brugia Timori
?Microfilaria of Brugia timori are sheathed and measure on average 310 µm in stained blood smears and 340 µm in 2% formalin. Microfilaria of B. timori differ from B. malayi by a having a longer cephalic space, a sheath that does not stain with Giemsa, and a larger number of single-file nuclei towards the tail. Microfilariae circulate in the blood.
Shown below is an image of microfilariae of B. timori in a thick blood smear from a patient from Indonesia, stained with Giemsa and captured at 500x oil magnification

Onchocerca volvulus
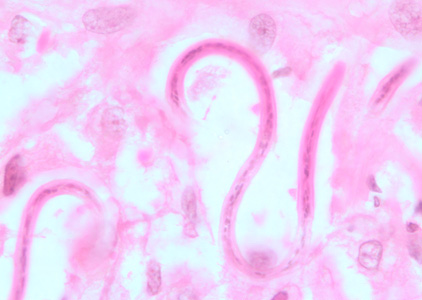
Microfilariae of Onchocerca volvulus are unsheathed and measure 300-315 µm in length. The tail tapers to a point and is often sharply bent. The nuclei do not extend to the tip of the tail. Microfilariae typically reside in skin but may be found in blood or urine during heavy infections, or invade the eye and cause a condition known as river blindness.
Shown below is an image of microfilariae of O. volvulus from a skin nodule of a patient from Zambia, stained with H&E

Antigen Detection
Antigen detection using an immunoassay for circulating filarial antigens constitutes a useful diagnostic approach, because microfilaremia can be low and variable. A rapid-format immunochromatographic test, applicable to Wuchereria bancrofti antigens, has been recently evaluated in the field.
Antibody Detection
Antibody detection is of limited value. Substantial antigenic cross reactivity exists between filaria and other helminths, and a positive serologic test does not distinguish between past and current infection.