Obtaining venous and arterial access: Difference between revisions
No edit summary |
m (Robot: Automated text replacement (-{{SIB}} +, -{{EH}} +, -{{EJ}} +, -{{Editor Help}} +, -{{Editor Join}} +)) |
||
| Line 5: | Line 5: | ||
'''Editors-In-Chief:''' Alexandra Almonacid M.D., Jeffrey J.Popma M.D., C. Michael Gibson, M.S., M.D. | '''Editors-In-Chief:''' Alexandra Almonacid M.D., Jeffrey J.Popma M.D., C. Michael Gibson, M.S., M.D. | ||
==Anatomy of the Femoral Triangle== | ==Anatomy of the Femoral Triangle== | ||
| Line 74: | Line 74: | ||
http://www.seattleavir.com/equipsup.html | http://www.seattleavir.com/equipsup.html | ||
[[Category:Emergency medicine]] | [[Category:Emergency medicine]] | ||
[[Category:Cardiology]] | [[Category:Cardiology]] | ||
Revision as of 14:27, 20 August 2012


Editors-In-Chief: Alexandra Almonacid M.D., Jeffrey J.Popma M.D., C. Michael Gibson, M.S., M.D.
Anatomy of the Femoral Triangle
The femoral triangle of Scarpa is an anatomical region of the upper inner human thigh.
Boundaries
It is bounded by:
- the inguinal ligament superiorly
- the sartorius muscle laterally
- the adductor longus muscle medially
- Its floor is formed by the iliopsoas and pectineus.
- Its roof is formed by the fascia lata.
Contents
It is important as a number of vital structures pass through it, right under the skin - most notably (from lateral to medial):
- the femoral nerve
- the femoral artery
- the femoral vein
it also contains the deep inguinal nodes.
Mnemonics
Several mnemonics have been created to remember the order of the nerve, artery, and vein in this triangle:
- lateral to medial - "NAVEL" nerve, artery, vein, empty space, lymphatics.
- medial to lateral - "VAN": vein, artery, nerve. These three structures are found in the same order in the intercostal space, from top to bottom.
- medial to lateral - "vagina, artery, nerve"
- the phrase "venous near the penis" can be used to remember that the vein is more medial than the artery or nerve.
Identification of Landmarks for Access
Femoral Access:
The right or left femoral arteries are the most commonly used access sites for coronary arteriography. The common femoral artery courses medially to the femoral head and the bifurcation of the common femoral artery into its branches is generally distal to the middle third of the femoral head, which can be localized by fluoroscopy before arterial puncture. The anterior wall of the common femoral artery should be punctured several centimeters below the inguinal ligament but proximal to the bifurcation of the superficial femoral and profunda arterial branches. If the puncture site is proximal to the inguinal ligament, hemostasis after the procedure may be difficult with manual compression, leading to an increased risk of retroperitoneal hemorrhage. If the puncture site is at or distal to the femoral bifurcation, there is a higher risk of pseudoaneurysm formation after sheath removal. Ipsilateral cannulation of the femoral artery and femoral vein also increases the risk of arteriovenous fistula formation. Calcification of the femoral artery may also be present which may guide in placement of the arterial and venous sheaths.
Radial and Brachial Access:
Although Sones first introduced the cutdown approach to the brachial artery for coronary arteriography, access to the brachial and radial arteries is now most often obtained percutaneously. These approaches are preferred to the femoral approach in the presence of severe peripheral vascular disease and morbid obesity (1, 2), and radial artery access is generally preferred to brachial catheterization due to its ease of catheter entry and removal (3). Systemic anticoagulation with intravenous heparin or bivalirudin is used for both approaches to prevent catheter thrombosis. The radial artery approach allows immediate ambulation after coronary arteriography with lower cost (compared with femoral closure devices) and improved coronary visualization (compared with smaller 4F diameter femoral catheters) (4). The radial approach relies upon the use of smaller guiding catheters. In addition, these approach to the coronary ostium is from the right, rather than from the left via the aortic arch with the femoral approach, and this may present a challenge in cannulating the coronary arteries. Support may be reduced as a result of smaller guiding catheter equipment. Arterial spasm and variable anatomy in the arm and the subclavian arteries may pose obstacles. SVGs can be engaged using either brachial or radial artery, but cannulation of the internal mammary artery (IMA) is best performed from the left brachial or radial artery. Engagement of the left IMA from the right brachial or radial artery is technically challenging but may be performed using a “headhunter” or another shaped catheter for selective entry into the left subclavian artery. A 0.035-inch angled hydrophilic guidewire is the most useful support wire for access to the subclavian artery. Special Considerations Regarding Catheter Selection: The brachial artery easily accommodates an 8F (1 French = 0.33mm in diameter) sheath, whereas the radial artery is smaller and generally limited to 5 to 7F catheters. Before radial artery access is attempted, an Allen test should be carried out to ensure that the ulnar artery is patent in the event of radial artery occlusion (5).
Local Subcutaneous Anesthetic Administration
Initially, Lidocaine should be administered subcutaneously with a small gauge needle (25 gauge). The patient should be warned before the needle is inserted. Two small blebs are then raised at the two sites where the skin will be punctured (the venous insertion site and the arterial insertion site). These two blebs should be approximately 1 cm apart from each other. The skin should be rubbed after the Lidocaine has been inserted to facilitate the entry of the anesthetic throughout the subcutaneous tissue. If possible, a brief time should lapse before the deeper anesthetic is administered.
A larger 21 gauge needle is then used to administer Lidocaine more deeply. The patient should be told that they may feel a sensation of burning with this deep Lidocaine administration. Attempts should not be made to enter the artery with the needle used for injection. Indeed, before each deep injection is made, the operator should pull backwards on the syringe to assure that a Lidocaine injection is not being made directly into the vein or the artery. Direct administration of a bolus of Lidocaine into the arterial or venous system could result in Lidocaine toxicity.
Cannulation of the Artery: Equipment and Technique
For right handed operators, the pulse should be palpated with the left hand, and the cannula should be held in the right hand. Some operators will puncture between the two fingers that are palpating the pulse. Other operators puncture below the two fingers palpating the pulse. The bevel of the canula should be pointing up so that the wire can freely move antegrade when it enters the vessel.
There are two ways to access the arterial system:
The Single Wall Puncture Technique:
In this technique, only the front wall of the artery is punctured. The benefit of this technique is the potential to limit bleeding complications. A single wall needle is also called a thin wall needle. It does not have a stylet. When puncturing with this needle, advance the needle until you get blood return.
-
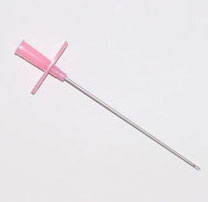
Single wall puncture needle without a stylet.
-

The needle is advanced until the lumen is entered and blood flows from cannula.
-
With bevel up, insert wire into lumen. No resistance should be encountered.


The Double Wall Puncture or Seldinger Technique:
In this technique, both the front and the the back walls of the artery are punctured. Once the needle is advanced deeply to puncture both walls, remove the stylet and pull back on the needle until you get blood return. With the bevel facing up, insert the wire antegrade. There should be no resistance. Next, pull the needle out of the artery and wipe the blood from the wire. You can then advance the sheath or the catheter in over the wire.
-
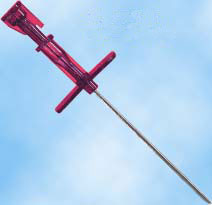
Seldinger or Double Wall Needle with Sylet
-

Insert needle through both anterior & posterior wall of artery.
-
Remove stylet, withdraw needle until blood flows from cannula
-
With bevel up, insert wire into lumen. No resistance should be encountered


Both the single wall and double wall needles are usually 18 gauge. Source of pictures: http://www.seattleavir.com/equipsup.html