==Before Inserting an Image into a Chapter, You Must First Upload the Image on the WikiDoc Server==
==Before Inserting an Image into a Chapter, You Must First Upload the Image on the WikiDoc Server==
Images can be ''inserted'' into a WikiDoc page only if they have been uploaded onto the WikiDoc server (the computer that serves up all the pages you view). If the images you want to insert are not yet on the server, you can add them (a process called "uploading" them) onto the server. Each WikiDoc page has a link in its left hand margin called [http://en.wikidoc.org/index.php/Special:Upload '''Upload file'''] which has all of the details for adding or uploading the image to the server.
Images can be ''inserted'' into a WikiDoc page only if they have been uploaded onto the WikiDoc server (the computer that serves up all the pages you view). If the images you want to insert are not yet on the server, you can add them (a process called "uploading" them) onto the server. To reach the upload page, you can either click [http://en.wikidoc.org/index.php/Special:Upload '''Upload file'''] or search WikiDoc for Special:Upload. This page has all of the details for adding or uploading the image to the server.
On the Upload file page you will see the following two boxes:
On the Upload file page you will see the following two boxes:
Line 6:
Line 10:
[[Image:Upload-file.jpg]]
[[Image:Upload-file.jpg]]
Where it says "Source filename:" you will click on the gray button "browse" and find the file on your computer's hard drive that you want to add to WikiDoc.
Where it says "Source file name:" you will click on the gray button "browse" and find the file on your computer's hard drive that you want to add to WikiDoc.
Where it says "Destination filename:" you will simply type in the name you want the image to have on WikiDoc. Please use a name that is descriptive of the image so that it will be found and cataloged by search engines.
Where it says "Destination file name:" you will simply type in the name you want the image to have on WikiDoc. Please use a name that is descriptive of the image so that it will be found and cataloged by search engines. This point must be stressed, name the file similar to a search criteria that you would use to find that image using a search engine's image function.
Next, click on the button that says "Upload file".
Next, click on the button that says "Upload file".
Next, the uploaded image will apear. '''''Hint:''''' '''copy the name of the file so that you can insert it on the WikiDoc page you would like.'''
Next, the uploaded image will appear. '''''Hint:''''' '''copy the name of the file so that you can insert it on the WikiDoc page you would like.'''
Once you are anyone else have added an image to the server, that image can then be inserted on an any number of pages.
Once you or anyone else has added an image to the server, that image can then be inserted on an any number of pages.
You can find the filenames of the images that have been uploaded to WikiDoc on the [[Special:Imagelist|Image file list]]. You will need to know the filename of the image to insert the image.
You can find the file names of the images that have been uploaded to WikiDoc on the [[Special:Imagelist|Image file list]]. You will need to know the file name of the image to insert the image.
You can see the images that have been uploaded to WikiDoc on the [[Special:Newimages|Gallery of new images]]
You can see the images that have been uploaded to WikiDoc on the [[Special:Newimages|Gallery of new images]]
Line 25:
Line 29:
===Insert the Image Code===
===Insert the Image Code===
Images are placed on a page by typing a line of image code along with the other text. As with the typing of text, this is done in the editing window of the page being edited. Selecting the ''edit this page'' tab at the top of the page accesses the editing panel. Sign-on first so that your work will be credited to you in the record keeping.
Images are placed on a page by typing a line of image code along with the other text. As with the typing of text, this is done in the editing window of the page being edited. Selecting the ''edit this page'' tab at the top of the page accesses the editing panel. Sign-in first so that your work will be credited to you in the record keeping.
Before placing the code, first consider the best place for the image. This usually means thinking about how the text will look when it wraps. For example, sometimes the work looks best when the image is level with the start of a section. If you want it to start there, then make an empty line immediately ''under'' the heading or immediately ''above'' it, depending on which you think looks best, and type the image code, (given later). The extra line will be ignored apart from the production of an image.
Before placing the code, first consider the best place for the image. This usually means thinking about how the text will look when it wraps. For example, sometimes the work looks best when the image is level with the start of a section. If you want it to start there, then make an empty line immediately ''under'' the heading or immediately ''above'' it, depending on which you think looks best, and type the image code, (given later). The extra line will be ignored apart from the production of an image.
Line 53:
Line 57:
|- valign="top"
|- valign="top"
|Floating to the right side of the page and with a caption:
|Floating to the right side of the page and with a caption:
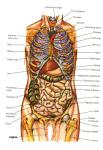
[[Image:Humanbody.jpg|thumb|100px|left|Anatomy]]The new syntax is backward compatible, so articles don't have to be changed.
[[Image:Humanbody.jpg|thumb|100px|left|Anatomy]]The new syntax is backward compatible, so articles don't have to be changed.
In the syntax <tt><nowiki>[[</nowiki>Image:''filename''|''options''<nowiki>]]</nowiki></tt> (e.g. <tt><nowiki>[[Image:Humanbody.jpg|thumb|100px|left|Anatomy]]</nowiki></tt> shown in the left), several options can be set when including an image. Those affect the placing of the image, its size or the way the image will be presented. The options are <tt>right</tt>, <tt>left</tt>, <tt>center</tt>, <tt>none</tt>, <tt>''size''px</tt>, <tt>thumbnail</tt> (<tt>thumb</tt>), <tt>frame</tt>, and <tt>''alternate (caption) text''</tt>.{{clr}}
In the syntax <tt><nowiki>[[</nowiki>Image:''file name''|''options''<nowiki>]]</nowiki></tt> (e.g. <tt><nowiki>[[Image:Humanbody.jpg|thumb|100px|left|Anatomy]]</nowiki></tt> shown in the left), several options can be set when including an image. Those affect the placing of the image, its size or the way the image will be presented. The options are <tt>right</tt>, <tt>left</tt>, <tt>center</tt>, <tt>none</tt>, <tt>''size''px</tt>, <tt>thumbnail</tt> (<tt>thumb</tt>), <tt>frame</tt>, and <tt>''alternate (caption) text''</tt>.{{clr}}
::[[Image:Humanbody.jpg|thumb|This text is not displayed.|70px|left|]][[Image:Humanbody.jpg|thumb|This text is displayed.|70px|right]]In particular, if the last option is the void text (that is, if there is nothing between the last vertical bar and the closing brackets), the caption is not displayed: <tt><nowiki>[[Image:Humanbody.jpg|thumb|This text is not displayed.|70px|left|]]</nowiki></tt> (shown on the left) and <tt><nowiki>[[Image:Humanbody.jpg|thumb|This text is displayed.|70px|right]]</nowiki></tt> (shown on the right).{{clr}}
::[[Image:Humanbody.jpg|thumb|This text is not displayed.|70px|left|]][[Image:Humanbody.jpg|thumb|This text is displayed.|70px|right]]In particular, if the last option is the void text (that is, if there is nothing between the last vertical bar and the closing brackets), the caption is not displayed: <tt><nowiki>[[Image:Humanbody.jpg|thumb|This text is not displayed.|70px|left|]]</nowiki></tt> (shown on the left) and <tt><nowiki>[[Image:Humanbody.jpg|thumb|This text is displayed.|70px|right]]</nowiki></tt> (shown on the right).{{clr}}
; <tt>''size''px</tt> : [[Image:Humanbody.jpg|right|50px|]]This option renders a version of the image that's ''[size]'' pixels wide (e.g. <tt><nowiki>[[Image:Humanbody.jpg|right|50px|]]</nowiki></tt> shown on the right). Height is computed to keep [[En:aspect ratio (image)|aspect ratio]] (i.e. the shape of the image){{clr}}
; <tt>''size''px</tt> : [[Image:Humanbody.jpg|right|50px|]]This option renders a version of the image that's ''[size]'' pixels wide (e.g. <tt><nowiki>[[Image:Humanbody.jpg|right|50px|]]</nowiki></tt> shown on the right). Height is computed to keep [[En:aspect ratio (image)|En:aspect ratio (image)]] (i.e. the shape of the image){{clr}}
:: '''Notes:'''{{clr}}
:: '''Notes:'''{{clr}}
::Specifying a size does not just change the apparent image size using HTML; it actually generates a resized version of the image on the fly and links to it appropriately. This happens whether or not you use '''size''' in conjunction with '''thumb'''.''
::Specifying a size does not just change the apparent image size using HTML; it actually generates a resized version of the image on the fly and links to it appropriately. This happens whether or not you use '''size''' in conjunction with '''thumb'''.
::This means the server does all the work of changing the image size, not the web browser of the user. By having the server do all the work means faster downloading of pages. It also means that larger images can be stored on the server without any slowdown by the browser (especially on dial up telephone lines.) Only the data for the actual size on the page is transmitted.
::This means the server does all the work of changing the image size, not the web browser of the user. By having the server do all the work means faster downloading of pages. It also means that larger images can be stored on the server without any slowdown by the browser (especially on dial up telephone lines.) Only the data for the actual size on the page is transmitted.
::From [[m:MediaWiki 1.5|MediaWiki 1.5]] the default thumbnail width can be set in the preferences, so it is recommended ''not'' to specify "px", in order to respect the users' preferences (unless, for a special reason, a specific size is required regardless of preferences, or a size is specified outside the range of widths 120–300px that can be set in the preferences).
::From MediaWiki 1.5 the default thumbnail width can be set in the preferences, so it is recommended ''not'' to specify "px", in order to respect the users' preferences (unless, for a special reason, a specific size is required regardless of preferences, or a size is specified outside the range of widths 120–300px that can be set in the preferences).
:: If you specify a "frame" option the image will not be scaled, and no size specifiers will be in the HTML. The image will be rendered at full size{{clr}}
:: If you specify a "frame" option the image will not be scaled, and no size specifiers will be in the HTML. The image will be rendered at full size{{clr}}
:: [[Image:Humanbody.jpg|right|50px|80px]]When there are two or more "size" options, only the last one is valid: <tt><nowiki>[[Image:Humanbody.jpg|right|50px|80px]]</nowiki></tt> (shown on the right).{{clr}}
:: [[Image:Humanbody.jpg|right|80px]]When there are two or more "size" options, only the last one is valid: <tt><nowiki>[[Image:Humanbody.jpg|right|50px|80px]]</nowiki></tt> (shown on the right).{{clr}}
; <tt>thumbnail</tt>, <tt>thumb</tt> : [[Image:Humanbody.jpg|thumbnail|left|100px|]][[Image:Humanbody.jpg|thumb|Anatomy]]The <tt>thumbnail</tt> (<tt>thumb</tt>) option generates a [[En:thumbnail|thumbnail]] image. It is automatically resized when the "size" attribute is not specified. Without the options <tt>left</tt>, <tt>center</tt>, and <tt>none</tt>, the image is normally on the right. If the image has a caption text, it is displayed in the lower margin. E.g. <tt><nowiki>[[Image:Humanbody.jpg|thumbnail|left|100px|]]</nowiki></tt> (shown on the left) and <tt><nowiki>[[Image:Humanbody.jpg|thumb|Anatomy]]</nowiki></tt> (shown on the right). ''Note: thumbnail (thumb) cannot be used in lists.''
; <tt>thumbnail</tt>, <tt>thumb</tt> : [[Image:Humanbody.jpg|thumbnail|left|100px|]][[Image:Humanbody.jpg|thumb|Anatomy]]The <tt>thumbnail</tt> (<tt>thumb</tt>) option generates a [[En:thumbnail|En:thumbnail]] image. It is automatically resized when the "size" attribute is not specified. Without the options <tt>left</tt>, <tt>center</tt>, and <tt>none</tt>, the image is normally on the right. If the image has a caption text, it is displayed in the lower margin. E.g. <tt><nowiki>[[Image:Humanbody.jpg|thumbnail|left|100px|]]</nowiki></tt> (shown on the left) and <tt><nowiki>[[Image:Humanbody.jpg|thumb|Anatomy]]</nowiki></tt> (shown on the right). ''Note: thumbnail (thumb) cannot be used in lists.''
{{clr}}
{{clr}}
<!-- The following paragraph is supposed to show how one can display a 10 by 10 pixel image as 100 by 100, and that clicking on "enlarge" actually shows it smaller (in the original size). But it doesn't seem to work--the image is displayed 10 by 10. -->
<!-- The following paragraph is supposed to show how one can display a 10 by 10 pixel image as 100 by 100, and that clicking on "enlarge" actually shows it smaller (in the original size). But it doesn't seem to work--the image is displayed 10 by 10. -->
[[Image:tst.jpg|right|thumb|100px|This is a globe, and take a look at it in [[Media:tst.jpg|the actual size]].]]An "enlarge"-icon is put also in the lower margin of the thumbnail. Both the image itself and the icon link to the image description page with the image in its actual size. The icon shows the link title "Enlarge" in its hoverbox, even in cases where this term does not apply, because it leads from the enlarged image to the one with the actual size. E.g. <tt><nowiki>[[Image:tst.jpg|right|thumb|100px|This is a puzzle, and take a look at it in [[Media:tst.jpg|the actual size]].]]</nowiki></tt> (shown on the right).{{clr}}
[[Image:tst.jpg|right|thumb|100px|This is a globe, and take a look at it in [//www.wikidoc.org/images/b/bc/Tst.jpg the actual size].]]An "enlarge"-icon is put also in the lower margin of the thumbnail. Both the image itself and the icon link to the image description page with the image in its actual size. The icon shows the link title "Enlarge" in its hoverbox, even in cases where this term does not apply, because it leads from the enlarged image to the one with the actual size. E.g. <tt><nowiki>[[Image:tst.jpg|right|thumb|100px|This is a puzzle, and take a look at it in [[Media:tst.jpg|the actual size]].]]</nowiki></tt> (shown on the right).{{clr}}
; <tt>frame</tt> : [[Image:Humanbody.jpg|frame|thumbnail|50px|Anatomy]]With this option, the embedded image is shown with its actual size enclosed by a frame, regardless of the "thumb" or "size" attribute, and the caption, if any, is visible in the frame. Without the options <tt>left</tt>, <tt>center</tt>, and <tt>none</tt>, the image is normally on the right: <tt><nowiki>[[Image:Humanbody.jpg|frame|thumbnail|50px|Anatomy]]</nowiki></tt>.{{clr}}
; <tt>frame</tt> : [[Image:Humanbody.jpg|frame|thumbnail|50px|Anatomy]]With this option, the embedded image is shown with its actual size enclosed by a frame, regardless of the "thumb" or "size" attribute, and the caption, if any, is visible in the frame. Without the options <tt>left</tt>, <tt>center</tt>, and <tt>none</tt>, the image is normally on the right: <tt><nowiki>[[Image:Humanbody.jpg|frame|thumbnail|50px|Anatomy]]</nowiki></tt>.{{clr}}
Line 192:
Line 196:
{| class="wikitable"
{| class="wikitable"
!colspan=3| How to use <tt>none</tt>
! colspan="3" | How to use <tt>none</tt>
|----
|----
!colspan=3| London's palaces
! colspan="3" | London's palaces
|----
|----
| Palace of Westminster || [[Image:Humanbody.jpg|thumb|none|100px|From the Thames]] || <tt><nowiki>[[Image:Humanbody.jpg|thumb|none|100px|From the Thames]]</nowiki></tt>
| Palace of Westminster || [[Image:Humanbody.jpg|thumb|none|100px|From the Thames]] || <tt><nowiki>[[Image:Humanbody.jpg|thumb|none|100px|From the Thames]]</nowiki></tt>
Line 209:
Line 213:
[[Image:Humanbody.jpg|right|thumbnail|This is a picture of the [[humanbody]] on wikidoc]]
[[Image:Humanbody.jpg|right|thumbnail|This is a picture of the [[humanbody]] on wikidoc]]
<br style="clear:both;"/>
<br style="clear:both;" />
Just make sure the number of opening and closing square brackets are right. One extra or missing would mean the entire image syntax line would not work.
Just make sure the number of opening and closing square brackets are right. One extra or missing would mean the entire image syntax line would not work.
Line 231:
Line 235:
<nowiki><gallery>
<nowiki><gallery>
Image:humanbody.jpg
Image:humanbody.jpg
Image:Femoral artery and branches.jpg
Image:Femoral artery and branches.jpg
Image:Femoral-triangle.jpg
Image:Femoral-triangle.jpg
Image:Femoral-traingle-2.jpg
Image:Femoral-traingle-2.jpg
Image:Femoral-artery1.jpg
Image:Femoral-artery1.jpg
</gallery></nowiki>
</gallery></nowiki>
This code generates the following image:
This code generates the following image:
Line 254:
Line 258:
<nowiki><gallery perRow="3">
<nowiki><gallery perRow="3">
Image:humanbody.jpg
Image:humanbody.jpg
Image:Femoral artery and branches.jpg
Image:Femoral artery and branches.jpg
Image:Femoral-triangle.jpg
Image:Femoral-triangle.jpg
Image:Femoral-traingle-2.jpg
Image:Femoral-traingle-2.jpg
Image:Femoral-artery1.jpg
Image:Femoral-artery1.jpg
</gallery></nowiki>
</gallery></nowiki>
Displays the following
Displays the following
<gallery perRow="3">
<gallery perrow="3">
Image:humanbody.jpg
Image:humanbody.jpg
Line 297:
Line 301:
==How Do I Align the Gallery to the right or left and have text float around it?==
==How Do I Align the Gallery to the right or left and have text float around it?==
'''To achieve the format below:'''
'''To achieve the format below:'''
<gallery
<gallery align="right">
align="right"
>
Image:Arteriole-normal.jpg|Normal arteriole
Image:Arteriole-normal.jpg|Normal arteriole
Image:Arteriole-hypertensive.jpg|Hypertensive arteriole with wall thickening and myocyte hypertrophy
Image:Arteriole-hypertensive.jpg|Hypertensive arteriole with wall thickening and myocyte hypertrophy
Line 309:
Line 311:
Use this code:
Use this code:
<nowiki><gallery
<nowiki><gallery
align="right"
align="right"
>
>
Image:Arteriole-normal.jpg|Normal arteriole
Image:Arteriole-normal.jpg|Normal arteriole
Image:Arteriole-hypertensive.jpg|Hypertensive arteriole with wall thickening and myocyte hypertrophy
Image:Arteriole-hypertensive.jpg|Hypertensive arteriole with wall thickening and myocyte hypertrophy
Image:Arteriole-hcm.jpg|Arteriole in HCM patient with periarteriole fibrosis and thicknening
Image:Arteriole-hcm.jpg|Arteriole in HCM patient with periarteriole fibrosis and thicknening
</gallery>
</gallery>
Compared to normal arterioles on the left, the arterioles from a patient with hyertension (middle) show moderate periarteriolar thickening and fibrosis. Shown on the right is a patient with HCM in which there is even more signficant periarteriolar thickening and fibrosis. This thickening of the wall of the intramyocardial arterioles leads to an increased wall/lumen ratio, subendocardial ischemia and impaired coronary flow reserve.</nowiki>
Compared to normal arterioles on the left, the arterioles from a patient with hyertension (middle) show moderate periarteriolar thickening and fibrosis. Shown on the right is a patient with HCM in which there is even more signficant periarteriolar thickening and fibrosis. This thickening of the wall of the intramyocardial arterioles leads to an increased wall/lumen ratio, subendocardial ischemia and impaired coronary flow reserve.</nowiki>
==Linking To A Page That Has A Detailed Description Of The Image==
==Linking To A Page That Has A Detailed Description Of The Image==
Before Inserting an Image into a Chapter, You Must First Upload the Image on the WikiDoc Server
Images can be inserted into a WikiDoc page only if they have been uploaded onto the WikiDoc server (the computer that serves up all the pages you view). If the images you want to insert are not yet on the server, you can add them (a process called "uploading" them) onto the server. To reach the upload page, you can either click Upload file or search WikiDoc for Special:Upload. This page has all of the details for adding or uploading the image to the server.
On the Upload file page you will see the following two boxes:
Where it says "Source file name:" you will click on the gray button "browse" and find the file on your computer's hard drive that you want to add to WikiDoc.
Where it says "Destination file name:" you will simply type in the name you want the image to have on WikiDoc. Please use a name that is descriptive of the image so that it will be found and cataloged by search engines. This point must be stressed, name the file similar to a search criteria that you would use to find that image using a search engine's image function.
Next, click on the button that says "Upload file".
Next, the uploaded image will appear. Hint:copy the name of the file so that you can insert it on the WikiDoc page you would like.
Once you or anyone else has added an image to the server, that image can then be inserted on an any number of pages.
You can find the file names of the images that have been uploaded to WikiDoc on the Image file list. You will need to know the file name of the image to insert the image.
You can see the images that have been uploaded to WikiDoc on the Gallery of new images
Basic Instructions for Inserting Images onto a WikiDoc Page
Only images that have been uploaded to Wiki doc can be used. To upload images, use the upload page.
Insert the Image Code
Images are placed on a page by typing a line of image code along with the other text. As with the typing of text, this is done in the editing window of the page being edited. Selecting the edit this page tab at the top of the page accesses the editing panel. Sign-in first so that your work will be credited to you in the record keeping.
Before placing the code, first consider the best place for the image. This usually means thinking about how the text will look when it wraps. For example, sometimes the work looks best when the image is level with the start of a section. If you want it to start there, then make an empty line immediately under the heading or immediately above it, depending on which you think looks best, and type the image code, (given later). The extra line will be ignored apart from the production of an image.
Press the Show preview button at the bottom of the editing window and wait for the system to display the reformatted page. If the image was placed on the left or the right then the text will be seen to wrap around the image from the very top of the section. If the center was selected, (or none), then the text cannot wrap, and the text will move to a point below the image. If the result is not as expected, then the text can be changed as often as necessary, until it is right. When the work is right, then press the Save page button at the bottom of the page.
Most images on the Wiki server are simply too big to display in their full sizes. In nearly every case an image reduction will be needed. The server also expects to know where to place the image, as well as what kind of frame is required. Does it need a caption? With these common requirements in mind, and to save the user much valuable time, it is proposed to go straight onto the recommended format; the one having all of the basic options in it. A selection of common examples using the recommended syntax is given in the "Examples" section below.
Examples
What it looks like
What you type
A picture:
A picture:
[[Image:humanbody.jpg]]
With alternative text:
With alternative text:
[[Image:humanbody.jpg|Anatomy]]
Alternative text, used when a mouse hovers over the image or when the image is not loaded in a text-only browser, or when spoken aloud, is strongly encouraged.
Floating to the right side of the page and with a caption:
Anatomy
Floating to the right side of the page
and with a caption:
[[Image:humanbody.jpg|frame|Anatomy]]
The frame tag automatically floats the image right.
The caption is also used as alternate text.
Floating to the right side of the page without a caption:
Anatomy
Floating to the right side of the page
''without'' a caption:
[[Image:humanbody.jpg|right|Anatomy]]
The help topic on Extended image syntax explains more options.
Linking directly to the description page of an image:
Linking directly to an image
without displaying it:
[[media:humanbody.jpg|Anatomy]]
To include links to images shown as links instead of drawn on the page, use a "media" link.
Using the div tag to separate images from text (note that this may allow images to cover text):
Example:
<div style="display:inline;
width:220px; float:right;">
Place images here </div>
Using wiki markup to make a table in which to place a vertical column of images (this helps edit links match headers, especially in Firefox browsers):
Example: {| align=right
|-
|
Place images here
|}
See the Wikidoc's image use policy as a guideline used on Wikidoc.
All information on this page is attributed to Wikipedia and its contributors
More Detailed Instructions for Inserting Images and its Syntax
Type
"thumbnail" or "thumb": Image is scaled down to a standard, user specified width, by default 180 pixels, and a box is added around the image. If a caption is written, it is shown below the image. Image defaults to placement on the 'right' unless overridden with the 'Location' attribute (see above).
"frame": Original image size is preserved, and a box is added around the image. If a caption is written, it is shown below the image.
(nothing specified): Original image size is preserved, no border is added around the image. If a caption is written, it is not shown.
"border": Same as if nothing is specified, but a border is added around the image.
Location
"right": Image including its box is placed on the right side of the page. The article text that follows the image flows around the image.
"left": Image including its box is placed on the left side of the page. The article text that follows the image flows around the image.
"center": Image including its box is placed in the center of the page. The article text that follows the image is placed below the image.
"none": Image including its box is placed on the left side of the page. The article text that follows the image is placed below the image.
Size
"100px": Scales the image down to make it 100 pixels wide. Replace any number for 100. If you specify "thumbnail" and a value here, this value will take precedent. If the image is already smaller than your specified value, the image stays at its size.
"100x200px": Scales the image to be no wider than 100 pixels and no higher than 200 pixels. Image will keep its original aspect ratio
Caption
Any element which cannot be identified as one of the above is assumed to be caption text.
New advanced syntax for inserting images
Anatomy
The new syntax is backward compatible, so articles don't have to be changed.
In the syntax [[Image:file name|options]] (e.g. [[Image:Humanbody.jpg|thumb|100px|left|Anatomy]] shown in the left), several options can be set when including an image. Those affect the placing of the image, its size or the way the image will be presented. The options are right, left, center, none, sizepx, thumbnail (thumb), frame, and alternate (caption) text.
Human Body
The options can be combined, and vertical bars ("|") are used to separate options from each other. The options can be put in any order. An unknown option is taken as the caption text, but this seems to appear only if thumbnail is specified. If there are two or more unknown options, the last one upstages the rest: [[Image:Humanbody.jpg|thumb|Anatomy|200px|right|Human Body]] (shown on the right).
Here is the description of the options other than the caption text:
right
The image is right-aligned, and text floats to the left of the image: [[Image:Humanbody.jpg|right|70px|]] (shown on the right).
left
The image is left aligned, and text floats to the right of the image: [[Image:Humanbody.jpg|left|70px|]] (shown on the left).
center
The image is centered, and...the text following the image starts below it: [[Image:Humanbody.jpg|center|70px|]] (shown above).
none
The image is put at the left, and...the text following does not float to the right (or to the left, obviously), and starts below it: [[Image:Humanbody.jpg|none|70px|]] (shown above).
Notes:
The above four options are incompatible. When used combined, the last one overrides the rest: [[Image:Humanbody.jpg|none|right|center|left|70px|]] (shown on the left).
What is between the last vertical bar and the closing brackets ("]]"), void or not, is taken as the last option, and works as usual. For instance, when the last option is right, the image is right-aligned, and text floats to the left: [[Image:Humanbody.jpg|70px|right]] (shown on the right).
This text is displayed.In particular, if the last option is the void text (that is, if there is nothing between the last vertical bar and the closing brackets), the caption is not displayed: [[Image:Humanbody.jpg|thumb|This text is not displayed.|70px|left|]] (shown on the left) and [[Image:Humanbody.jpg|thumb|This text is displayed.|70px|right]] (shown on the right).
sizepx
This option renders a version of the image that's [size] pixels wide (e.g. [[Image:Humanbody.jpg|right|50px|]] shown on the right). Height is computed to keep (i.e. the shape of the image)
Notes:
Specifying a size does not just change the apparent image size using HTML; it actually generates a resized version of the image on the fly and links to it appropriately. This happens whether or not you use size in conjunction with thumb.
This means the server does all the work of changing the image size, not the web browser of the user. By having the server do all the work means faster downloading of pages. It also means that larger images can be stored on the server without any slowdown by the browser (especially on dial up telephone lines.) Only the data for the actual size on the page is transmitted.
From MediaWiki 1.5 the default thumbnail width can be set in the preferences, so it is recommended not to specify "px", in order to respect the users' preferences (unless, for a special reason, a specific size is required regardless of preferences, or a size is specified outside the range of widths 120–300px that can be set in the preferences).
If you specify a "frame" option the image will not be scaled, and no size specifiers will be in the HTML. The image will be rendered at full size
When there are two or more "size" options, only the last one is valid: [[Image:Humanbody.jpg|right|50px|80px]] (shown on the right).
thumbnail, thumb
AnatomyThe thumbnail (thumb) option generates a image. It is automatically resized when the "size" attribute is not specified. Without the options left, center, and none, the image is normally on the right. If the image has a caption text, it is displayed in the lower margin. E.g. [[Image:Humanbody.jpg|thumbnail|left|100px|]] (shown on the left) and [[Image:Humanbody.jpg|thumb|Anatomy]] (shown on the right). Note: thumbnail (thumb) cannot be used in lists.
An "enlarge"-icon is put also in the lower margin of the thumbnail. Both the image itself and the icon link to the image description page with the image in its actual size. The icon shows the link title "Enlarge" in its hoverbox, even in cases where this term does not apply, because it leads from the enlarged image to the one with the actual size. E.g. [[Image:tst.jpg|right|thumb|100px|This is a puzzle, and take a look at it in [[Media:tst.jpg|the actual size]].]] (shown on the right).
frame
AnatomyWith this option, the embedded image is shown with its actual size enclosed by a frame, regardless of the "thumb" or "size" attribute, and the caption, if any, is visible in the frame. Without the options left, center, and none, the image is normally on the right: [[Image:Humanbody.jpg|frame|thumbnail|50px|Anatomy]].
With none of the options other than sizepx and alternate (caption) text, an embedded image is rendered inline.
text text text text text text
[[Image:Humanbody.jpg|150px|Anatomy]]
text text text text text
[[Image:tst.jpg|100px|This is a puzzle.]]
text text text text
gives
text text text text text text
text text text text text
text text text text
The option none can be used to have thumbnails without left- or right-alignment. This is probably most useful for tables. This is an example:
How to use none
London's palaces
Palace of Westminster
From the Thames
[[Image:Humanbody.jpg|thumb|none|100px|From the Thames]]
Just make sure the number of opening and closing square brackets are right. One extra or missing would mean the entire image syntax line would not work.
Additional caption formatting options
Additional caption formatting options are possible.
[[Image:Humanbody.jpg|right|thumbnail|<div align="center">This is <span style="color: green">the </span><br /> [[Palace of Westminster]]<br /> '''in <span style="color: red">London</span>'''</div>]]
How Do I Keep All The Text From Floating Around The Image? How Can I Get The Text To Begin Again Below the Image? Cancelling The Floating-Around-Image Mode
After having had an image floating next to text, putting further text below it and again using the full width can be done with the following markup. This blocks an image from appearing next to the material following this markup, possibly due to aesthetic reasons or a change in topics.
<br style="clear:both" />
For legacy align="right" (etc.) floating this
isn't good enough; legacy browsers would ignore inline
CSS. To cancel floating under all conditions the
following markup (valid XHTML 1.0 transitional) works:
<br clear="all" />
The same code can be issued by using template
{{Clr}} or {{-}} or <br clear="left"/>
in certain namespaces (En, meta).
How Do I Align the Gallery to the right or left and have text float around it?
To achieve the format below:
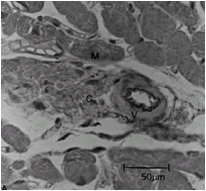
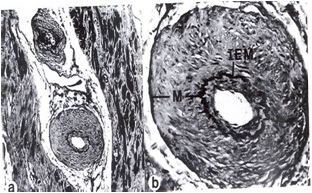
Normal arteriole
Hypertensive arteriole with wall thickening and myocyte hypertrophy
Arteriole in HCM patient with periarteriole fibrosis and thicknening
Compared to normal arterioles on the left, the arterioles from a patient with hyertension (middle) show moderate periarteriolar thickening and fibrosis. Shown on the right is a patient with HCM in which there is even more signficant periarteriolar thickening and fibrosis. This thickening of the wall of the intramyocardial arterioles leads to an increased wall/lumen ratio, subendocardial ischemia and impaired coronary flow reserve.
Use this code:
<gallery
align="right"
>
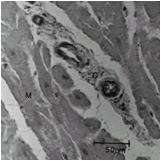
Image:Arteriole-normal.jpg|Normal arteriole
Image:Arteriole-hypertensive.jpg|Hypertensive arteriole with wall thickening and myocyte hypertrophy
Image:Arteriole-hcm.jpg|Arteriole in HCM patient with periarteriole fibrosis and thicknening
</gallery>
Compared to normal arterioles on the left, the arterioles from a patient with hyertension (middle) show moderate periarteriolar thickening and fibrosis. Shown on the right is a patient with HCM in which there is even more signficant periarteriolar thickening and fibrosis. This thickening of the wall of the intramyocardial arterioles leads to an increased wall/lumen ratio, subendocardial ischemia and impaired coronary flow reserve.
Linking To A Page That Has A Detailed Description Of The Image
If you want to make a link to the description page for an image, use a leading colon before "image:" in an intra-wiki link, like this: [[:image:humanbody.jpg|humanbody]] which yields: humanbody


